Step-by-step tutorial: Extension
This document contains a step-by-step guide to building a SMIA agent and endowing it with intelligence and extended autonomy. It offers detailed steps to follow, as well as source code for specific parts, to successfully reproduce the development tutorial.
Note
All resources for this tutorial are available in the official SMIA repository.
Introduction
Tutorial Description
The tutorial consists of three phases. It starts by generating the necessary pre-configuration, such as the CSS-enriched AAS model for the SMIA instance. Next, the logic is developed, and the agent is extended with said autonomy. Finally, the developed agent is tested and validated. The three phases are illustrated in the following figure:
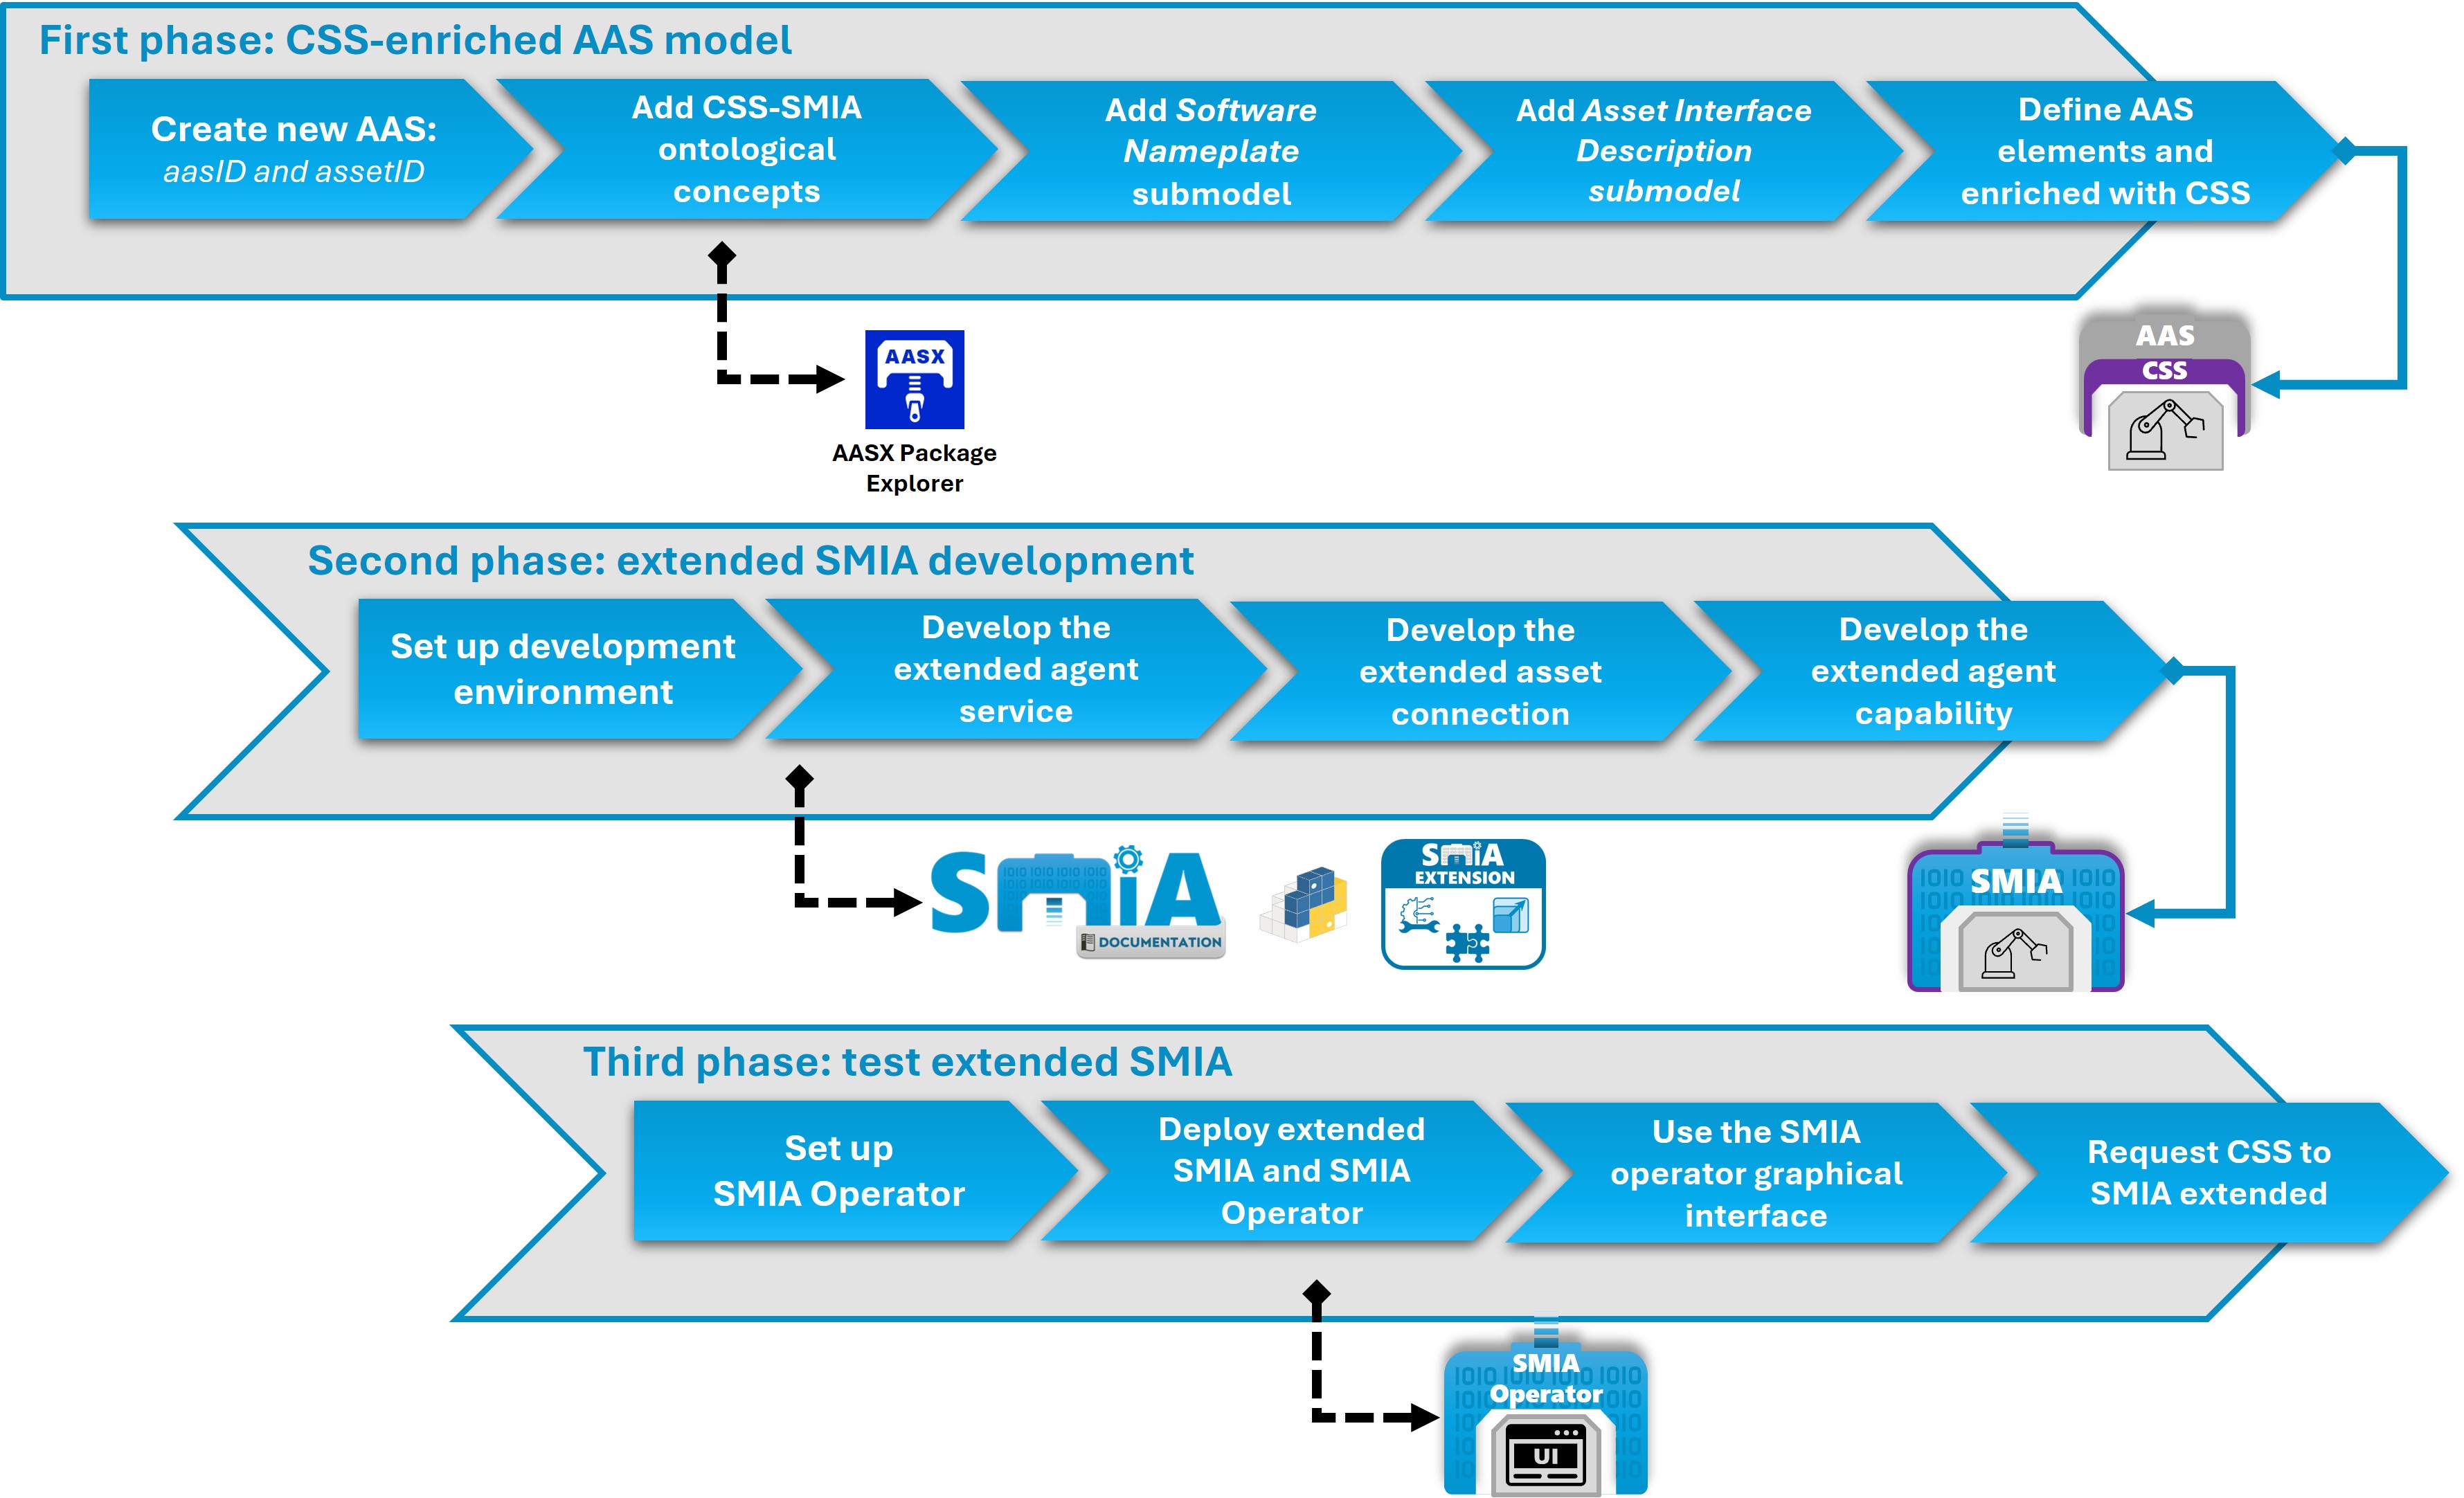
Figure: SMIA extension guided tutorial steps
The objective is to increase the agent’s autonomy using the three extension mechanisms it offers: adding an agent service, adding an agent capability, and adding an asset interface (asset connection). The explanation of each extension, as well as the CSS-enriched AAS elements of the asset to be defined, is presented in the following figure:
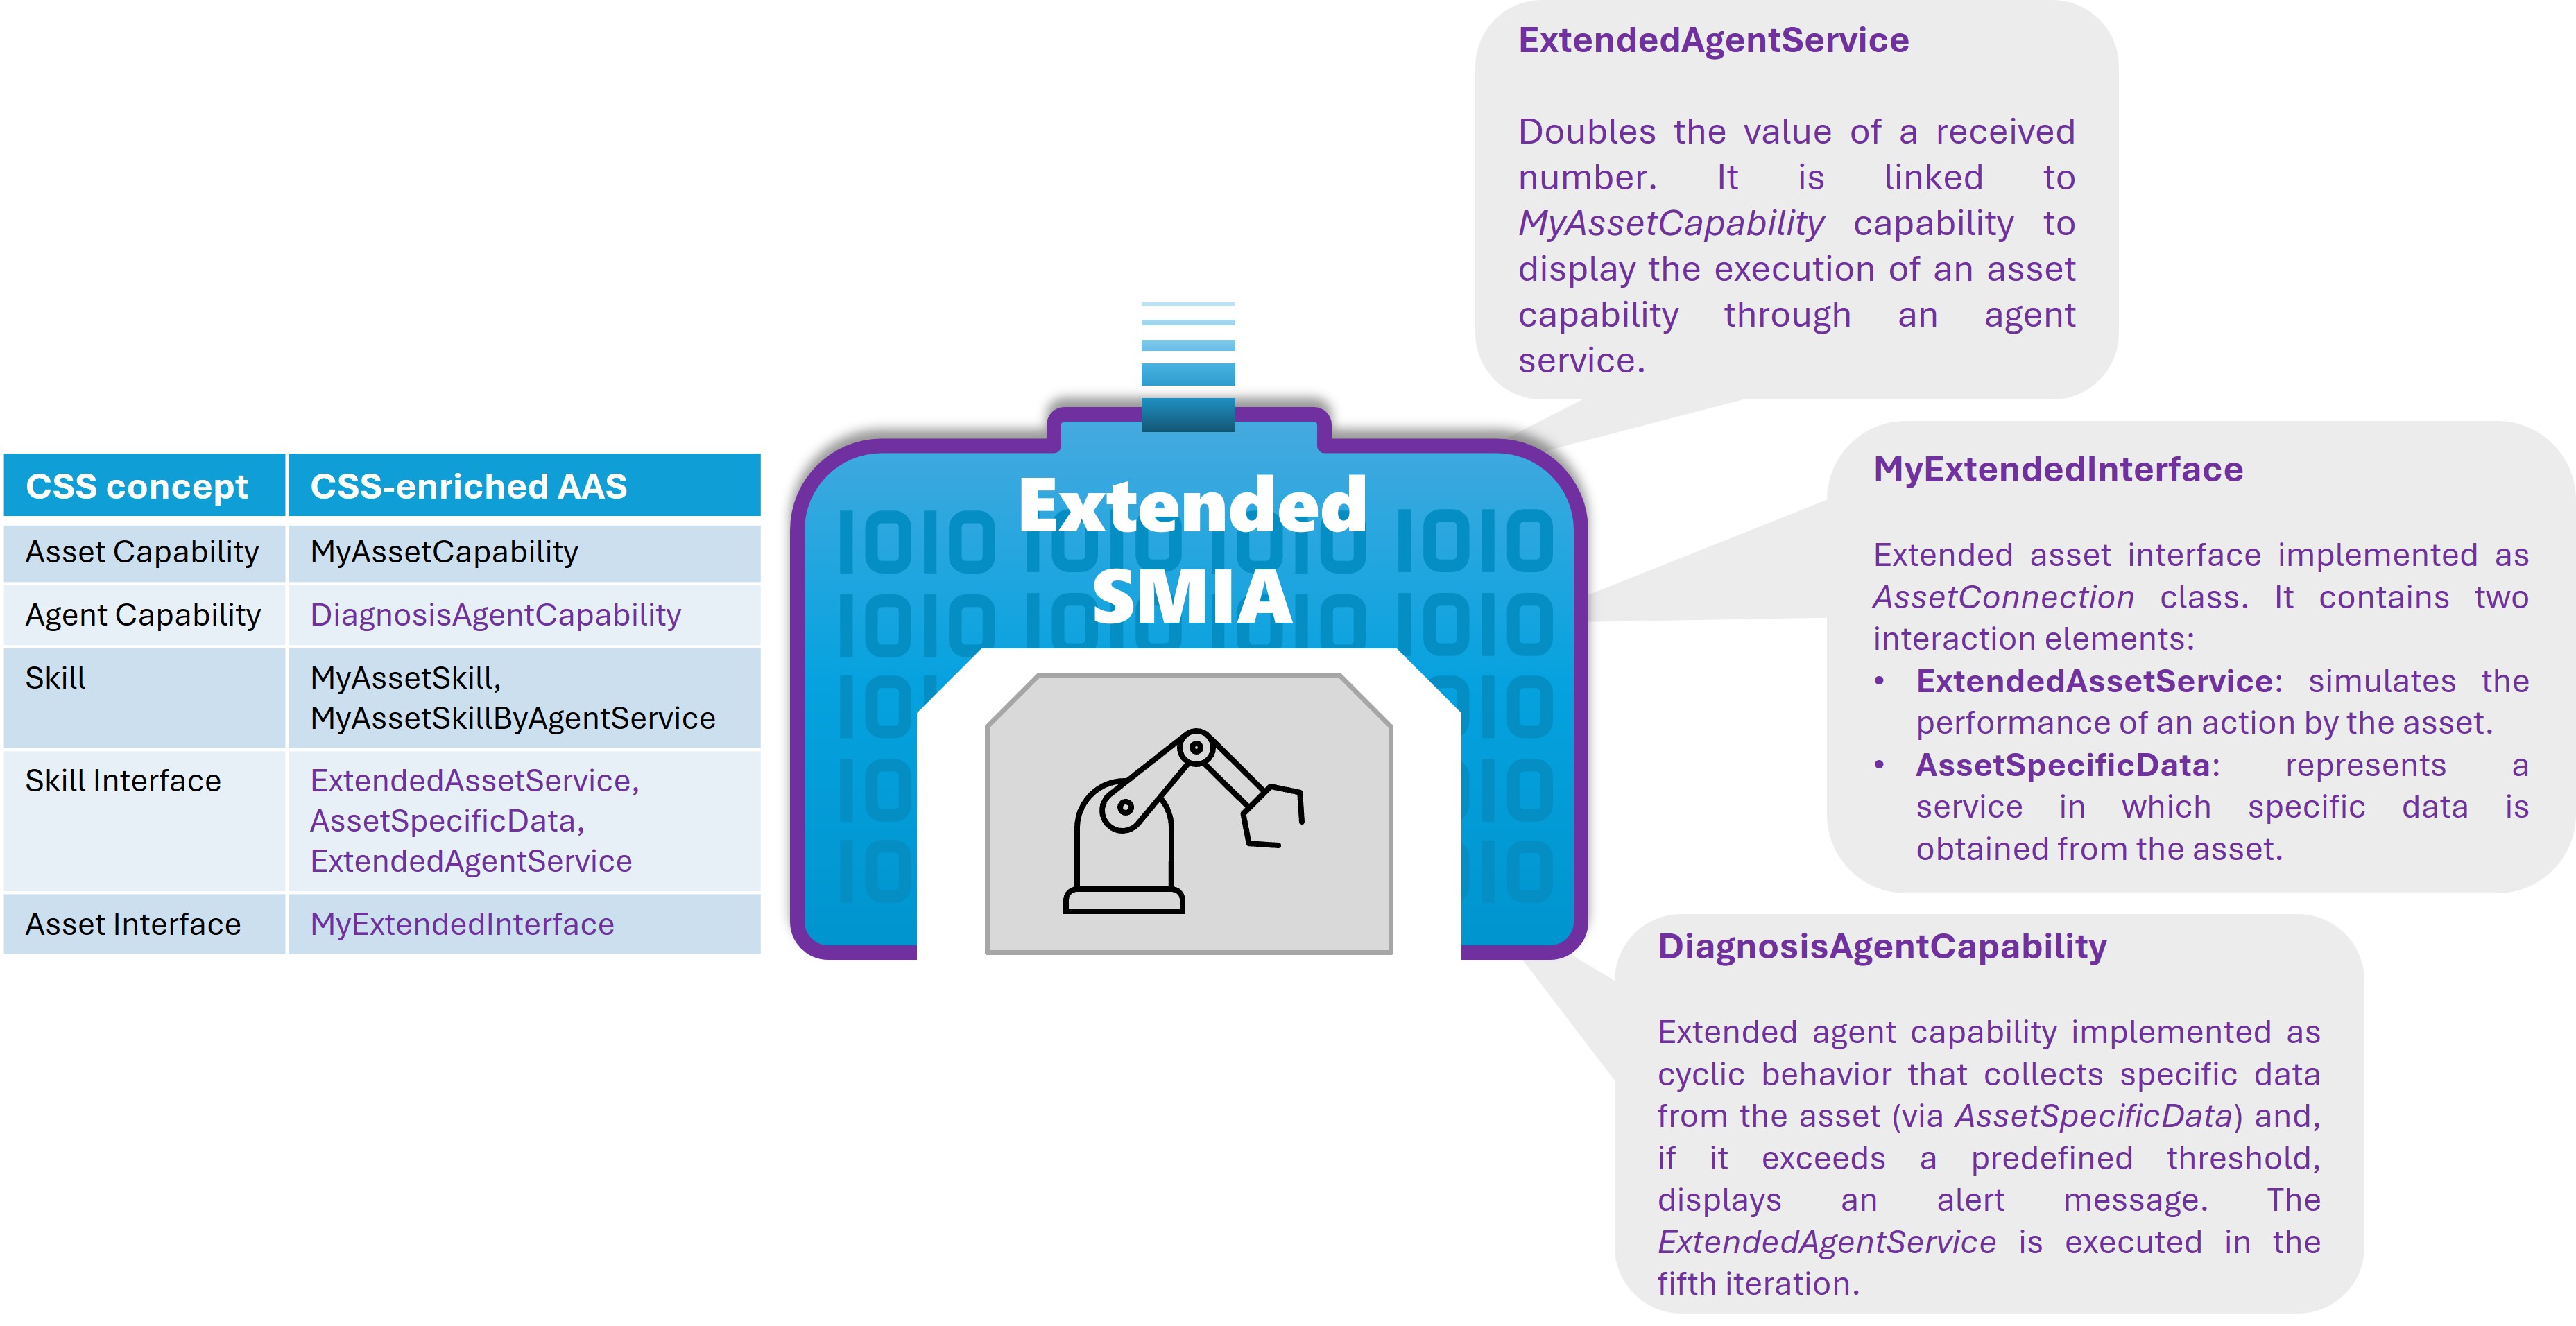
Figure: SMIA extension guided tutorial asset info
Tutorial Objective
Upon completing this practice, you will have achieved the following:
Model: Create a CSS-enriched AAS model that defines the asset’s capabilities and serves to enable the self-configuration of the SMIA agent.
Extend: Develop the logic that allows adding augmented autonomy to the SMIA agent, as well as injecting it into the software via its extension mechanisms.
Validate: Test and validate the new autonomous capabilities through peer-to-peer interaction between agents. The SMIA Operator agent will be used to make requests via an intuitive graphical interface (abstracting the underlying implementation using I4.0 Language).
Development Environment
Before starting the code development part of the tutorial, it is necessary to verify that all resources are ready:
AASX Package Explorer: Required for the development of the CSS-enriched AAS model. To achieve this, you can follow the SMIA installation guide.
SMIA package: Required for code development and generation of the extended agent. To achieve this, you can follow the SMIA installation guide.
SMIA Operator: The external agent that offers a graphical interface to make requests to SMIA agents. It can be obtained from the GitHub repository.
First Phase: Generate the CSS-enriched AAS model
In the first phase, we will generate the CSS-enriched AAS model that will allow the SMIA agent to self-configure and obtain all information related to the asset it will represent. The steps to follow to generate the model from scratch are as follows:
Open the ``AASX Package Explorer`` tool and configure it for edit mode (
Workspace > Edit).Create a new AAS within the environment and define its idShort. Also, add an identifier for the asset (it can be generated randomly in globalAssetId).
Add the ontological identifiers of the CSS model in the form of
ConceptDescriptions.3.1. Add the submodel with the ontological identifiers of the CSS model:
Workspace > Create ... > New submodel from plugin > AasxPluginGenericForms | GCIS/SubmodelWithCapabilitySkillOntology.3.2. From the submodel, generate the ConceptDescriptions with ontological identifiers of the CSS model: button
Create <- SMEs (all). Within ConceptDescriptions, all elements will have been generated. The submodel can now be deleted (buttonDelete), as well as its ConceptDescription (SubmodelWithCapabilitySkillOntology) so that it does not produce errors later (since it generates it with an empty id).Note
As of v2025-03-25, ConceptDescriptions are generated via the
SMEs (all)functionality, but this is not capable of generating all information from the plugin for the CSS model. If you do not wish to fill in all the remaining information (e.g., shortName of each concept), it is possible to obtain it from the base resource for the development of the CSS-enriched AAS model. To do this, you can open a new window of theAASX Package Explorertool, open the fileCSS_AAS_model_base.aasxoffered in this tutorial’s folder, select and copy all ConceptDescriptions using theCopybutton, andPaste intoin our AAS.Add the submodel for defining the SMIA software:
Workspace > Create ... > New submodel from plugin > AasxPluginGenericForms | Nameplate for Software in Manufacturing (IDTA) V1.0.4.1. Delete the SubmodelElement
SoftwareNameplateTypeand modify theSoftwareNameplateInstance: remove all occurrences of {0:00}.4.2. Specify the agent identifier in
SoftwareNameplateInstance/InstanceName[value](the same one that will later be defined in the JID in the code, although in this case without the XMPP server, i.e., only the identifier before “@”), and the agent version inSoftwareNameplateInstance/InstalledVersion[value](e.g., “0.3.1”). In addition to these mandatory data, the others are optional. You can add any data you wish to define the SMIA software in more depth (installed modules, OS on which it is deployed, etc.).Note
If you do not want to modify the submodel, you can obtain a valid submodel with the following process: open a new window of the
AASX Package Explorertool, open the fileCSS_AAS_model_base.aasxoffered in this tutorial’s folder, copy the “SoftwareNameplate” submodel using theCopybutton, and in our AAS,Paste into.
Step 5 only needs to be performed if the agent requires connection with the asset.
Add the submodel for defining the interface of the asset that the SMIA agent will represent:
Workspace > Create ... > New submodel from plugin > AasxPluginGenericForms | AssetInterfacesDescription (IDTA) V1.0. Completely define the SubmodelElementCollection corresponding to the protocols supported by the asset.5.1. In this tutorial, we are going to extend SMIA with a new interface, so we define a SubmodelElementCollection as
MyExtendedInterface.5.2. To test and validate the new interface, the EndpointMetadata/base element will be modified with an invented endpoint (e.g., “http://localhost:8080”), simply to verify it in the code to be developed in the following steps.
5.3. To test and validate an asset service, the first element of InteractionMetadata/properties/ will be modified. Modify its idShort (e.g., ExtendedAssetService) and the value of its datapoint in forms/href/ (e.g., /extendedservice).
5.4. To test access to an asset datum through an extended agent capability (developed later in this tutorial), copy the element from InteractionMetadata/properties/ and modify its idShort (e.g., AssetSpecificData) and the value of its datapoint in forms/href/ (e.g., /assetdata).
Note
The submodel must be completely defined so that it does not produce errors during the SMIA startup. If you wish to modify a valid submodel, you can open a new window of the
AASX Package Explorertool, open the fileCSS_AAS_model_base.aasxoffered in this tutorial’s folder, copy the “AssetInterfacesDescription” submodel using theCopybutton, and in our AAS,Paste into.Define the submodels with the asset information. To do this, create the submodels in the AAS via
Create new Submodel of kind Instance. For this tutorial, we will define two submodels to distinguish the information of the asset and its representative (SMIA agent), and the ontological relations of the CSS-enriched elements:AssetFunctionalInformationandAgentFunctionalInformation, andFunctionalRelationships.6.1. Define the submodel
AssetFunctionalInformation, adding the following SubmodelElements: Capability with idShort MyAssetCapability, Operation with idShort MyAssetSkill, Operation with idShort MyAssetSkillByAgentService, and Range with idShort MyAssetCapConstraint (with a type “xs:float” and values min: 0.0 and max: 5.0).6.2. Define the submodel
AgentFunctionalInformation, adding the following SubmodelElements: Property with idShort DiagnosisAgentCapability, Operation with idShort DiagnosisSkill, and Operation with idShort ExtendedAgentService (with a Property in OperationVariable In with idShort extended_param).Semantically enrich the SubmodelElements with the ontological concepts of the CSS model. To do this, in each created element, add the corresponding
semanticID.7.1. In each SubmodelElement to be enriched, create an empty semanticID (
Create w/ default!), thenAdd existingand select the identifiers corresponding to each element from the ConceptDescriptions (e.g., “http://www.w3id.org/upv-ehu/gcis/css-smia#AssetCapability” for asset capabilities).7.2. Define the submodel
FunctionalRelationships, adding a RelationshipElement for each ontological relationship, adding its semanticID following the procedure in step7.1, and linking the elements in the parametersfirstandsecond(use theAdd existingbutton to select the elements).7.3. Define the Qualifiers for capabilities, skills, and constraints. To do this, create an empty qualifier (
Create w/ default!), thenAdd presetand select the associated qualifier from ``GCIS | CSS | ``.Save the AASX file with the complete definition of the valid CSS-enriched AAS model. To do this, use the menu:
File > Save as ..., select the folder where the CSS-enriched AAS model will be saved and specify the name for the AASX file.
Second Phase: Develop the logic to extend SMIA
In this phase, the logic with augmented autonomy used to extend the SMIA agent will be developed. This will be divided into several parts, addressing different aspects to be extended.
Development and Deployment Environment Configuration
To develop and test the extended SMIA agent, an environment with access to the Python environment (with the SMIA package installed) must be enabled. In this environment, in this phase, we will simply test that the CSS-enriched AAS model we have generated is valid and that we are capable of starting a SMIA agent. To do this, follow these steps:
Copy the AASX file with the CSS-enriched AAS model we generated to the development environment.
Create a folder to add the source code to be developed (e.g.,
src/).Inside the generated folder (
src/), create a launcher file to serve as the startup for the SMIA agent. Following the SMIA extension guide, add the provided code for anExtensibleSMIAAgent. In the line loading the AAS model, define the AASX file we just generated (if it is in the main folder, add ‘../’).Note
SMIA offers different deployment mechanisms. It is recommended to deploy SMIA using Docker containers to ensure its operation in any environment. However, to perform the tests in this tutorial, it will be executed locally. For this, it is necessary to enable connection with the XMPP server, either a local one or an Internet server such as xmpp.jp (requires registering the JID and password beforehand at https://www.xmpp.jp/). Therefore, the final code looks like this:
Source code example for extended agent launcher
import smia
from smia.agents.extensible_smia_agent import ExtensibleSMIAAgent

def main():
    # First, the initial configuration must be executed
    smia.initial_self_configuration()

    # The AAS model is added to SMIA
    smia.load_aas_model('../SMIA_extension_guided_tutorial.aasx')

    # Create and run the extensible agent object
    my_extensible_smia_agent = ExtensibleSMIAAgent('gcis1@xmpp.jp', 'gcis1234')
    smia.run(my_extensible_smia_agent)

if __name__ == '__main__':
    main()
Start the SMIA agent by executing the
launcher.pyfile. The SMIA agent will generate asmia_archivefolder with the configuration files, along with the defined CSS-enriched AAS model.Note
During startup, it will fail because it does not have the OWL file with the definition of the CSS model ontology. This file can be obtained from the GitHub repository and must be copied into
smia_archive/config/. After copying the OWL file, you can runlauncher.pyagain and this time the SMIA agent will start perfectly.
Development of the Extended Agent Service
In the CSS-enriched AAS model, an ExtendedAgentService has been defined, which is executed via the request of MyAssetCapability with the implementation MyAssetSkillByAgentService. That is, it is an example of an asset capability that is executed in the digital representative (agent) itself.
To develop it, we will create a Python file (e.g., extended_services.py) inside the src/ folder and implement its logic, keeping in mind that it has an input parameter extended_param. This service duplicates the received value and returns it. The resulting code is as follows:
Source code example for the extended agent service
def extended_agent_service(extended_param: int):
    print("Hi! I am an extended agent service for duplicating numbers...")
    try:
        result = int(extended_param) * 2
        print("The received value and duplicated value: {}, {}".format(extended_param, result))
        return result
    except Exception as e:
        print("ERROR: The received parameter is not an integer: {}".format(extended_param))
To extend the SMIA agent with the new agent service, we import the method in launcher.py and add the service using the SMIA extension mechanism: agent.add_new_agent_service(). It is important to add the idShort of the SubmodelElement defined in the CSS-enriched AAS model (in this case ExtendedAgentService) in the service_id parameter. This line must be added after generating the agent and before starting it via smia.run(). The code to add in the launcher is the following:
Source code example for extending SMIA agent with developed agent service
from extended_services import extended_agent_service

[...]

    # Create and run the extensible agent object
    my_extensible_smia_agent = ExtensibleSMIAAgent('gcis1@xmpp.jp', 'gcis1234')

    # Add the extended agent service
    my_extensible_smia_agent.add_new_agent_service('ExtendedAgentService', extended_agent_service)

[...]
If you wish to test the service by executing it manually, you can add the following code before smia.run(), adding the necessary parameters (in this case extended_param):
Source code example for testing the developed agent service
import asyncio

[...]

    # Add the extended agent service
    my_extensible_smia_agent.add_new_agent_service('ExtendedAgentService', extended_agent_service)

    try:
        asyncio.run(my_extensible_smia_agent.agent_services.execute_agent_service_by_id('ExtendedAgentService', extended_param=26))
    except Exception as e:
        print("ERROR: An agent service cannot be executed.")

    smia.run(my_extensible_smia_agent)
Development of the Extended Connection with the Asset
Within the AssetInterfacesDescription submodel of the CSS-enriched AAS model, a MyExtendedInterface has been defined. This new interface represents an extended assetconnection in the SMIA agent. To develop it, we will create a Python file (e.g., extended_asset_interface.py) inside the src/ folder and program its logic. Being an assetconnection, it must be a class that inherits from smia.assetconnection.asset_connection.AssetConnection, containing all its methods. An example with the basic structure is presented in the SMIA extension guide.
In this case, we will define the class as MyExtendedInterface and add the desired logic. On one hand, we will add the configuration logic for the new asset connection, which in this tutorial will simply verify that the SubmodelElements of InterfaceElement and EndpointMetadata are valid and present the base defined for access.
On the other hand, we will add the logic to simulate the connection with the asset in the execute_asset_service() method. The objective is to simulate the connection with the asset regarding the two elements defined in the AAS. ExtendedAssetService simulates the performance of an action by the asset, presenting a progress bar on the console. AssetSpecificData represents a service in which specific data is obtained from the asset. The simulation is performed by generating a random number. The resulting code for the extended asset interface is as follows:
Source code example for the extended asset connection class
import asyncio
import logging
import random

from smia.assetconnection.asset_connection import AssetConnection
from smia.utilities.smia_info import AssetInterfacesInfo

_logger = logging.getLogger(__name__)

class MyExtendedInterface(AssetConnection):

    def __init__(self):
        # If the constructor will be overridden remember to add 'super().__init__()'.
        pass

    async def configure_connection_by_aas_model(self, interface_aas_elem):
        # The Interface element need to be checked
        await self.check_interface_element(interface_aas_elem)

        # General information about the connection to the asset is defined in the SMC 'EndpointMetadata'.
        self.endpoint_metadata_elem = interface_aas_elem.get_sm_element_by_semantic_id(
            AssetInterfacesInfo.SEMANTICID_ENDPOINT_METADATA)

        # The endpointMetadata element need to be checked
        await self.check_endpoint_metadata()

        base_property = self.endpoint_metadata_elem.get_sm_element_by_semantic_id(
            AssetInterfacesInfo.SEMANTICID_INTERFACE_BASE)
        _logger.assetinfo("Base endpoint of extended interface: {}".format(base_property.id_short))

    async def check_asset_connection(self):
        pass

    async def connect_with_asset(self):
        pass

    async def execute_asset_service(self, interaction_metadata, service_input_data=None):
        _logger.info("Hi! I am an Extended Interface that can simulate the connection to an asset.")
        _logger.info("The given AAS element is {}".format(interaction_metadata.id_short))

        if interaction_metadata.id_short == 'ExtendedAssetService':
            _logger.assetinfo("Executing the requested extended asset service...")
            steps = 5
            for i in range(steps + 1):
                await asyncio.sleep(.5)
                bar = '>>' * i + '-' * (steps - i) * 2
                _logger.assetinfo(f"[{bar}] {int((i / steps) * 100)}%")
            _logger.assetinfo("Extended asset service completed successfully.")
            result = {'status': 'OK'}
        elif interaction_metadata.id_short == 'AssetSpecificData':
            _logger.assetinfo("Obtaining the requested asset data...")
            result = round(random.uniform(0, 100), 2)
            _logger.assetinfo("The requested asset data value is: {}".format(result))
        else:
            result = {'status': 'OK'}

        return result

    async def receive_msg_from_asset(self):
        pass
To extend the SMIA agent with the new agent service, we import the class in launcher.py, create an instance of the class, and add it using the SMIA extension mechanism: agent.add_new_asset_connection(). It is important to add the idShort of the SubmodelElement defined in the CSS-enriched AAS model (in this case MyExtendedInterface) in the service_id parameter. This line must be added after generating the agent and before starting it via smia.run(). Therefore, the code to add in the launcher is as follows:
Source code example for extending SMIA agent with developed asset connection
from extended_asset_interface import MyExtendedInterface

[...]

    # Create and run the extensible agent object
    my_extensible_smia_agent = ExtensibleSMIAAgent('gcis1@xmpp.jp', 'gcis1234')

    # Add the extended Asset Interface (AssetConnection)
    extended_asset_interface = MyExtendedInterface()
    my_extensible_smia_agent.add_new_asset_connection('MyExtendedInterface', extended_asset_interface)

[...]
If you wish to test the extended interface and the asset services it offers manually, you can add the following test_asset_connection method and execute it before smia.run(). Asset interfaces are obtained from their AAS element relation enriched by the SkillInterface ontological concept. Therefore, to request an asset service, it is necessary to define a reference to the AAS element of its interface within the AssetInterfacesDescription submodel. This reference can be generated by copying (Copy to clipboard) referenced elements in RelationshipElement (“first” or “second”) from AASX Package Explorer and transforming the data into JSON.
Source code example for testing the new extended asset connection
import smia

async def test_asset_connection(myagent):
    aas_interface_ref = await smia.AASModelUtils.create_aas_reference_object(
        reference_type='ModelReference', keys_dict=[
            {'type': 'SUBMODEL', 'value': 'https://example.com/ids/sm/6505_6142_2052_5708'},
            {'type': 'SUBMODEL_ELEMENT_COLLECTION', 'value': 'MyExtendedInterface'},
            {'type': 'SUBMODEL_ELEMENT_COLLECTION', 'value': 'InteractionMetadata'},
            {'type': 'SUBMODEL_ELEMENT_COLLECTION', 'value': 'properties'},
            # {'type': 'SUBMODEL_ELEMENT_COLLECTION', 'value': 'ExtendedAssetService'},
            {'type': 'SUBMODEL_ELEMENT_COLLECTION', 'value': 'AssetSpecificData'},
        ])

    aas_interface_elem = await myagent.aas_model.get_object_by_reference(aas_interface_ref)
    new_asset_conn_ref = await smia.AASModelUtils.create_aas_reference_object(
        reference_type='ModelReference', keys_dict=[
            {'type': 'SUBMODEL', 'value': 'https://example.com/ids/sm/6505_6142_2052_5708'},
            {'type': 'SUBMODEL_ELEMENT_COLLECTION', 'value': 'MyExtendedInterface'},
        ])
    new_asset_conn_class = await myagent.get_asset_connection_class_by_ref(new_asset_conn_ref)
    result = await new_asset_conn_class.execute_asset_service(interaction_metadata=aas_interface_elem)
    print("An asset service has been executed with the new MyExtendedAssetConnection with result: {}".format(result))

def main():
    [...]

    # Add the extended Asset Interface (AssetConnection)
    extended_asset_interface = MyExtendedInterface()
    my_extensible_smia_agent.add_new_asset_connection('MyExtendedInterface', extended_asset_interface)

    try:
        # Executing asset service in extended interface...
        asyncio.run(test_asset_connection(my_extensible_smia_agent))
    except Exception as e:
        print("ERROR: An asset interface is not working properly.")

    smia.run(my_extensible_smia_agent)
Development of the Extended Agent Capability
In the CSS-enriched AAS model, a DiagnosisAgentCapability has been defined as an agent capability. Since this capability is not offered by the base SMIA, it is necessary to develop its logic and add it via extension. This new capability provides autonomy for diagnostic analysis of a specific asset datum. To develop its logic, we will create a Python file (e.g., extended_agent_capability.py) inside the src/ folder and add the class for the agent capability. Since this is an autonomous capability that requires remaining active, among the options offered by SPADE mentioned in the SMIA extension guide, the appropriate behavior is the CyclicBehaviour (an example is offered in the SPADE documentation).
In this case, we will define the class as DiagnosisAgentCapability, which inherits from CyclicBehaviour, and add the desired logic. In the constructor, we will store the SMIA agent object to have it accessible. In the run() method, we will add the logic to offer the capability’s autonomy. In this case, a cyclic behavior has been defined that executes every 3 seconds. It requests the asset service to obtain the specific data and, if it exceeds the predefined threshold, presents an alert message that an event must be triggered. To also demonstrate the ease of executing agent services, in the fifth iteration, the previously extended agent service is executed. The resulting code for the agent capability is as follows:
Source code example for the new agent capability class
import asyncio
import logging

import smia
from spade.behaviour import CyclicBehaviour

_logger = logging.getLogger(__name__)

class DiagnosisAgentCapability(CyclicBehaviour):

    def __init__(self, agent_object):
        super().__init__()

        self.interaction_num = 0
        self.event_threshold = 60.0
        self.myagent = agent_object

    async def run(self) -> None:

        _logger.info("Hi! I am an extended DiagnosisAgentCapability with interaction number: {}".format(self.interaction_num))
        self.interaction_num += 1

        try:
            if self.interaction_num == 5:
                # Let's execute the new extended agent service
                _logger.info("~~~~~~~~~~~~~~~~~~~~~~~~~~~~~~~~~~-")
                result = await self.myagent.agent_services.execute_agent_service_by_id(
                    'ExtendedAgentService', extended_param=self.interaction_num)
                _logger.info("The result of the new agent service ExtendedAgentService is {}".format(result))
                _logger.info("~~~~~~~~~~~~~~~~~~~~~~~~~~~~~~~~~~-")

            # Let's execute an asset service using the new Asset Connection
            aas_interface_ref = await smia.AASModelUtils.create_aas_reference_object(
                reference_type='ModelReference', keys_dict=[
                    {'type': 'SUBMODEL', 'value': 'https://example.com/ids/sm/6505_6142_2052_5708'},
                    {'type': 'SUBMODEL_ELEMENT_COLLECTION', 'value': 'MyExtendedInterface'},
                    {'type': 'SUBMODEL_ELEMENT_COLLECTION', 'value': 'InteractionMetadata'},
                    {'type': 'SUBMODEL_ELEMENT_COLLECTION', 'value': 'properties'},
                    {'type': 'SUBMODEL_ELEMENT_COLLECTION', 'value': 'AssetSpecificData'},
                ])
            aas_interface_elem = await self.myagent.aas_model.get_object_by_reference(aas_interface_ref)
            new_asset_conn_ref = await smia.AASModelUtils.create_aas_reference_object(
                reference_type='ModelReference', keys_dict=[
                    {'type': 'SUBMODEL', 'value': 'https://example.com/ids/sm/6505_6142_2052_5708'},
                    {'type': 'SUBMODEL_ELEMENT_COLLECTION', 'value': 'MyExtendedInterface'},
                ])
            new_asset_conn_class = await self.myagent.get_asset_connection_class_by_ref(new_asset_conn_ref)
            result = await new_asset_conn_class.execute_asset_service(interaction_metadata=aas_interface_elem)
            _logger.info("An asset service has been executed with the new MyExtendedInterface with result: {}".format(
                    result))
            if result > self.event_threshold:
                _logger.warning("The asset data has exceeded the defined threshold. An event must be triggered.")

        except Exception as e:
            _logger.error("An error occurred: {}".format(e))

        await asyncio.sleep(3)    # waits 3 seconds in every cyclic execution
To extend the SMIA agent with the new agent capability, we import the class in launcher.py, create an instance of the class (providing the agent instance), and add it using the SMIA extension mechanism: agent.add_new_agent_capability(). This line must be added after generating the agent and before starting it via smia.run(). This SPADE behavior representing the capability will run alongside the rest of the SMIA core behaviors when the agent enters the Running state.
Therefore, the code to add in the launcher is as follows:
Source code example for extending SMIA agent with developed agent capability
from extended_agent_capability import DiagnosisAgentCapability

[...]

    # Create and run the extensible agent object
    my_extensible_smia_agent = ExtensibleSMIAAgent('gcis1@xmpp.jp', 'gcis1234')

    # Add the extended agent capability
    extended_agent_cap = DiagnosisAgentCapability(agent_object=my_extensible_smia_agent)
    my_extensible_smia_agent.add_new_agent_capability(extended_agent_cap)

[...]
Third Phase: Validate the extended SMIA using SMIA Operator
Once the third phase is completed, the development of the extended SMIA has been achieved. This can be executed locally using the developed launcher.py. Another option is to encapsulate it in a Docker container using the methodology detailed in the SMIA extension guide.
In this tutorial, we will run it locally and validate it through requests from an external SMIA agent, to simulate the distributed scenario that occurs within the standardized multi-agent system proposed by the SMIA approach. To abstract the complexity of the I4.0 Language (FIPA-ACL) and to avoid developing another agent, the SMIA Operator tool offered by the GitHub repository will be used. This agent offers a graphical interface to make CSS requests using standardized I4.0 Language, abstracting away all complexity in the procedure to be followed.
The code for the SMIA Operator agent can be obtained from the GitHub repository. The smia_operator_agent folder must be downloaded and copied to the same directory as src/ (where we have developed the extended SMIA). To enable communication with our extended SMIA, the smia_operator_starter.py file must be modified to define a JID connected to the same XMPP server. Since the GitHub code is configured to be deployed via Docker, both the AAS model loading line and the XMPP JID and password from environment variables must be commented out. The AAS model can be specified as the AASX file offered in the same folder (SMIA_operator.aasx), and the JID and password can be added directly when creating the agent instance. Therefore, smia_operator_starter.py looks like this:
Source code example for modifying the SMIA Operator launcher
from extended_services import extended_agent_service

[...]

    # The AAS model is obtained from the environmental variables
    # aas_model_path = DockerUtils.get_aas_model_from_env_var()

    # When the AAS model path has been obtained, it is added to SMIA
    smia.load_aas_model('SMIA_operator.aasx')
    # smia.load_aas_model(aas_model_path)

    # The jid and password can also be set as environmental variables. In case they are not set, the values are obtained
    # from the initialization properties file
    # smia_jid = os.environ.get('AGENT_ID')
    # smia_psswd = os.environ.get('AGENT_PASSWD')

    # Create the agent object
    smia_extensible_agent = ExtensibleSMIAAgent('gcis2@xmpp.jp', 'gcis1234')

[...]
At this point, both the extended SMIA and SMIA Operator can be deployed. Both must share the SMIA Archive, so we must ensure that both AASX files are present in smia_archive/config/aas. This is necessary because SMIA Operator will analyze all AASX files in that folder to be able to obtain both CSS information about the assets they represent and information about the associated agents.
cd src
python extended_smia_launcher.py
cd smia_operator_agent
python smia_operator_starter.py
When the startup of both agents is complete, it is possible to access the SMIA Operator graphical interface via the browser: http://localhost:10000/smia_operator. To load the extended SMIA AASX, use the LOAD button. In the capabilities and skills table, both MyAssetCapability (with the constraint and its two associated skills) and DiagnosisAgentCapability will appear.
The capability to request in this case will be MyAssetCapability using the SELECT button. It will ask to provide the constraint value and to select the skill we desire. The extended SMIA will appear as a candidate (only if it meets the added restriction, i.e., a value between 0 and 5 as we defined in the AAS). If we have selected the skill MyAssetSkillByAgentService, it will ask us to add the parameter, which in this case is a number to duplicate via the previously developed agent service.
Finally, we must select our extended SMIA agent (in this case with ID “gcis1”) and use the REQUEST button to request the execution of the capability. When finished, the procedure followed by SMIA Operator and the result will be shown in the last message (Response:). With the BACK TO DASHBOARD button, you can return to the interface to make new requests.